Keeping batches low in your Unity mobile games is an important step to follow for mobile game development. To keep batches low you’ll need to either combine batches with batching or reduce on visible objects completely!
Keep reading to learn how to achieve good performance on a wide range of low spec cheap phones and tablets! Note that’s it’s important to keep a balance between GPU and CPU load! Batching will relieve the GPU stress but some methods increase the CPU overhead.
But wait! What are batches and why should I care?
Batches are another name for a group of draw calls given to the GPU using the same render state. The CPU processes the active cameras and determines what objects should and shouldn’t (referred to as culled) be rendered.
The CPU then sorts each object to be rendered into draw calls which contain information about how the GPU should render them.
Examples of the information stored in a draw call include vertices, textures, shader instructions or the draw order. If draw calls match the static or dynamic batching rules they’re then grouped together into a batch.
Next the CPU may send an instruction to the GPU telling it how to render the next batch (setting the render state). This is named the SetPass call and is only called if the render state is different from the previous rendered mesh.
Changing the render state is pretty costly so it’s a good idea to keep batches as low as possible in order to keep performance overhead from the GPU low too.
Static Batching
This is where static objects have their batches combined together. Static batching is very fast performance-wise however there’s a few limitations:
- Objects should not be moved, rotated, scaled or enabled/disabled constantly (there is a very high performance impact from doing this which is why your static objects should always remain static!)
- Objects must share the exact same material reference(s) to batch together
- Unity will not add anything else to a static batch group once it’s around about ~15k vertices, new static batch groups will be created
- Objects being static batched must be rendered together in order! If the render order has something else rendering between a batch then it’ll be broken up into multiple batches!
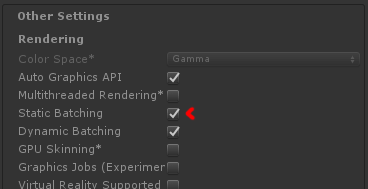
To enable Static Batching you need to first make sure it’s enabled in Player Settings > Other Settings then on objects which follow the limitations above which you want to be static batched select the gameobject and tick the static checkbox top right in the inspector window.


As well as the limitations of static batching the entire static mesh group will be rendered if any part of the static group is visible to the camera, if this means a lot of un-needed vertices then you’ll end up hurting performance more than you save!
If you had a scene reusing a lot of the same models too and decided to static batch them all then instead of recycling that single model in memory you’ll end up with the entire static model as a whole sitting in memory!
The major advantage of static batching over dynamic batching is that the CPU cost is VERY little in comparison! The mesh is generated on scene load or via the StaticBatchingUtility calls if you’re doing the batching manually.
However keep in mind that there will be a slight CPU overhead as Unity rebuilds the mesh whenever it leaves and re-enters the camera view (and this cost increases with more vertices are in a single batch!)
Dynamic Batching
Depending on the shader being used objects will dynamically batch if they’re below a certain amount of vertices:
- 180 vertices for a shader using vertex position, normal, UV0, UV1 and tangents
- 300 vertices for a shader using vertex position, normal and a single UV (This is the most common limit for simple objects with basic shaders)
(Note: If you’re developing a Unity PC game keep in mind that dynamic batching has a CPU overhead for batching so unless you’re being bottlenecked by heavy GPU rendering time you probably want to disable dynamic batching in your project!)
Unlike static batching, dynamically batched objects can be moved around and have physics with a rigidbody. They do also have their own set of limitations though:
- Must be the exact same scale to batch (mirrored scales are also not supported, e.g if you have an object with -1 scale vs an object with 1 scale)
- Need to share the exact same material reference(s) to batch together
- Must be rendered together in order! If the render order has something else rendering between a batch then it’ll be broken up into multiple batches
- Each object must be below the vertex limits mentioned above, depending on the shader it’s using
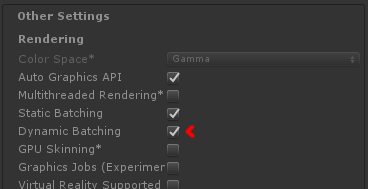
To dynamically batch your objects all you need to do is make sure Dynamic Batching is enabled in the Player Settings > Other Settings and follow the limitations listed above, if your batches aren’t combining as expected then you’ll need to use the frame debugger (see below) to help you debug why!

Dynamic batching isn’t always a good idea for all objects in your scene though! Even if you managed to reduce all objects down below 300 vertices the cost of tons of dynamic batching calculations would end up being a very expensive CPU operation. (although the GPU would be very happy!)
Make sure to monitor performance costs with the Unity profiler; lowering batches will reduce overhead from GPU rendering but the costs of the dynamic batching process will cost some CPU performance so consider other methods of reducing your batches if it’s becoming a problem!
Using the Frame Debugger to fix split batches due to render ordering
The frame debugger is a very useful tool added in Unity 5 which lists all rendered batches in the scene ordered by their render order.
In the latest versions of Unity 5/2017 there’s also tips explaining the reasons for batches not being merged.
You can open the frame debugger from Window > Frame Debugger then press the Enable button top left of the window to view the list. Set the right panel to ShaderProperties and click through the renders until you find a few objects which should be batched together.
If there’s other objects being rendered between them then you’ll need to fix your render order! You can do this by selecting a material and manually changing the render queue value.

(If you need to go into more detail and change the render order of separate objects all using the same material then you’ll need to write a script to change the mesh render’s sortingLayerName or sortingOrder – note that mesh sorting is a sub sorting method to setting the render queue, so you cannot render before or after higher or lower render queue values)
If you’re writing your own shader you can also set your render queue in there and materials will automatically use that (unless you’ve manually set a custom render queue for the material) however with the addition to the render queue now being directly settable in the inspector you might as well just set the render queue on materials instead as it’s probably a cleaner way to control it.
There’s a few methods for changing render orders to fix broken batches but the easiest method is just to set the render order on your materials.
(Later versions of Unity 5 made this directly changeable in the inspector, however in older versions you will need to set the inspector into debug mode to set the render order)
The above video shows a simple scene of cubes having the material render queues changed to reduce the scene from 12 batches down to just 4! (3 object batches + 1 for camera skybox)
Batching Overview
Another solution to reducing your overall batches might just be to lower the render distance of your cameras or set the camera layerCullDistances, limiting the render distance of specific layers instead.
(For example in a large city map you might want the tall buildings and roads to render far away but have street signs, traffic and trees to have a lower view distance)
External sources for more information
If you want to read more into batching check out these links, they were very helpful references while writing this.


3 Comments on “Unity Batching Mobile Games – Dynamic VS Static Batching”